


Table of contents
- TABLE OF CONTENTS
- VPC-1: US-EAST-1
- Step 1: Navigate to the VPC Dashboard
- Step 2: Create a VPC
- Step 3: Create a Public Subnet
- Step 4: Update Route Table for the Public Subnet
- Step 5: Create an Internet Gateway (IGW)
- Step 6: Update Subnet Route Association
- VPC-2: US-EAST-1
- Create a VPC
- Step 2: Create Subnets
- Step 3: Update Route Tables and Internet Gateway
- Step 4: Create a Private Route Table
- Step 2: Associate Private Subnets with the Private Route Table
- Step 3: Add a Route for Private Subnet Traffic
- Step 4: Create and Associate a NAT Gateway
- VPC-3: US-WEST-2
- Its time to connect all three vpc using transit gateway.
- Step 1: Create a Transit Gateway in us-east-1
- Step 2: Attach VPCs to the Transit Gateway
- Step 3: Update VPC Route Tables
- Step 4: Propagate Routes (Optional)
- Create a Transit Gateway Attachment with Type Peering
- Step 3: Accept Peering Attachment Requests
- Step 4: Update Route Tables (Optional)
- Step 1: Identify the Transit Gateways and Route Tables
- Step 2: Update Route Tables
- Step 1: Create an Application Load Balancer (ALB)
- Create a New Target Group
- Step 3: Configure Health Checks
- Step 2: Create EC2 Instances in Private Subnets
- Step 3: Attach EC2 Instances to ALB
- Test Connectivity:
TABLE OF CONTENTS
Goal
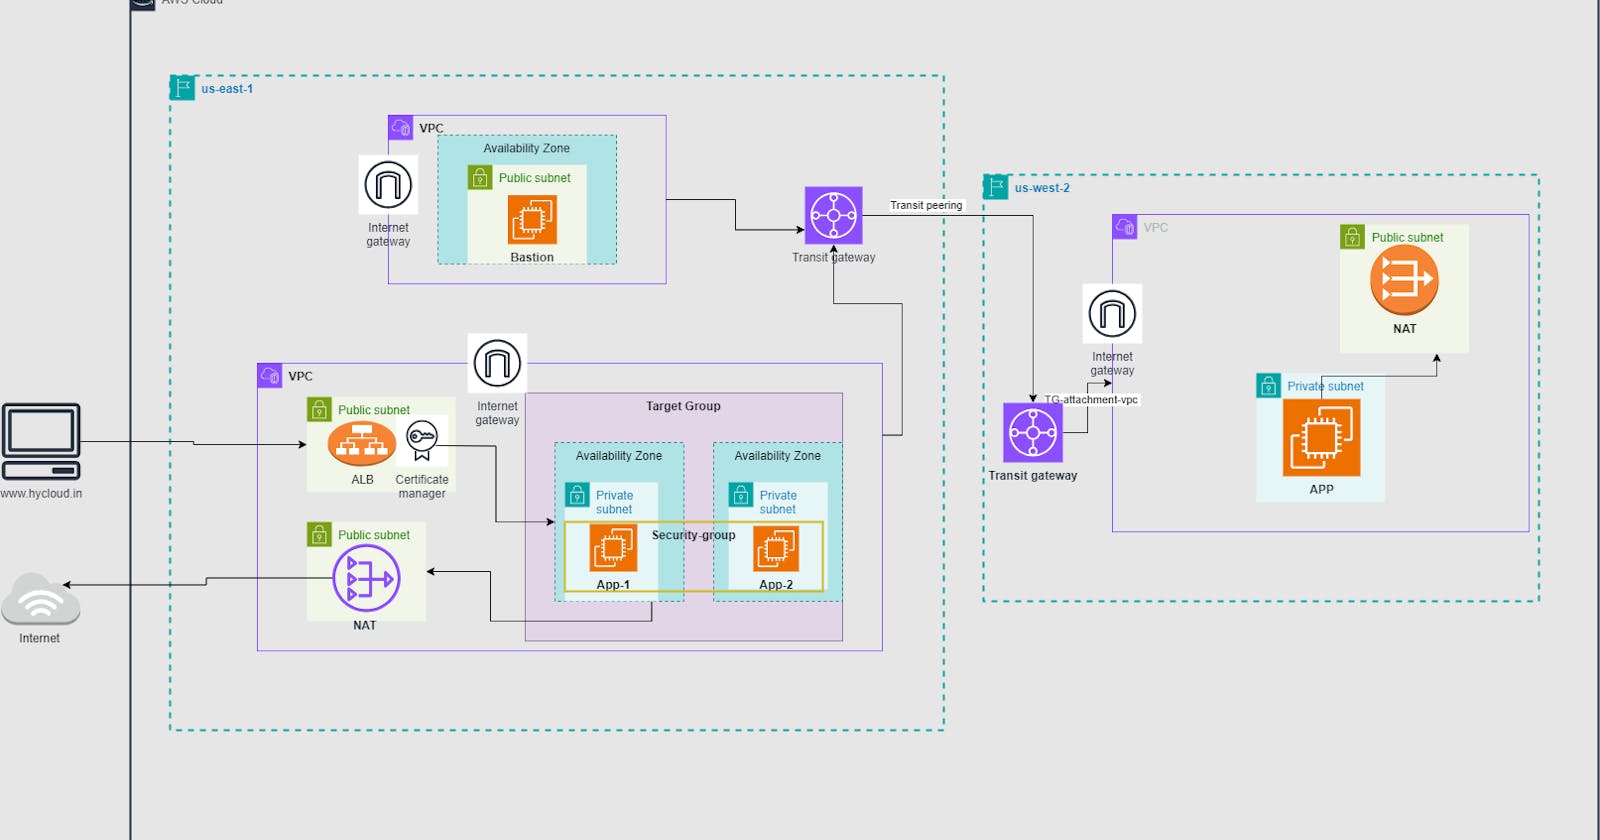
Deploy a Modular, Highly Available AWS VPC Architecture with Transit Gateway
Pre-Requisites
You must be having an AWS account to create infrastructure resources on AWS cloud.
Custom Domain Name
Create a SSL certificate.
VPC Deployment
VPC-1: US-EAST-1
Step 1: Navigate to the VPC Dashboard
Open the AWS Management Console.
Go to the "Services" dropdown and select "VPC" under the "Networking & Content Delivery" section.
Step 2: Create a VPC
In the VPC Dashboard, click on "Create VPC."
Fill in the following details:
Name tag: Provide a name for your VPC (e.g., hycloud-vpc-01).
IPv4 CIDR block: Enter
10.0.0.0/16.
Click on "Create VPC."
Step 3: Create a Public Subnet
In the VPC Dashboard, click on "Subnets" in the left navigation pane.
Click on "Create subnet."
Fill in the following details for your public subnet:
Name tag: Provide a name for your subnet (e.g., hycloud-PublicSubnet-01).
VPC: Select the VPC you created.
Availability Zone: Choose an availability zone (e.g., us-east-1a).
IPv4 CIDR block: Enter
10.0.1.0/24.
Click on "Create subnet."
Step 4: Update Route Table for the Public Subnet
In the VPC Dashboard, click on "Route Tables" in the left navigation pane.
Find the main route table associated with your VPC.
Click on the "Routes" tab.
Add a new route to make the subnet public:
Click on "Edit routes."
Add a route with the destination
0.0.0.0/0and the target as the Internet Gateway (IGW) ID. If you don't have an IGW, create one and attach it to your VPC.
Save the changes.
Step 5: Create an Internet Gateway (IGW)
In the VPC Dashboard, click on "Internet Gateways" in the left navigation pane.
Click on "Create internet gateway."
Attach the internet gateway to your VPC:
Select the IGW.
Click on "Attach to VPC."
Choose your VPC and click "Attach."
Step 6: Update Subnet Route Association
In the VPC Dashboard, click on "Subnet Associations" in the left navigation pane.
Select your public subnet and click on "Edit subnet associations."
Associate the subnet with the custom route table.
Save the changes.


VPC-2: US-EAST-1
Create a VPC
Navigate to the VPC Dashboard in the AWS Management Console.
Click on "Create VPC."
Fill in the following details:
Name tag: Provide a name for your VPC (e.g., hycloud-vpc-02).
IPv4 CIDR block: Enter
192.0.0.0/16.
Click on "Create VPC."
Step 2: Create Subnets
Public Subnets:
In the VPC Dashboard, click on "Subnets" in the left navigation pane.
Click on "Create subnet."
Fill in the following details for the first public subnet:
Name tag: hycloud-public-subnet-01
VPC: Select the VPC you just created.
Availability Zone: Choose an availability zone (e.g., us-east-1a).
IPv4 CIDR block: Enter
192.0.1.0/24.
Click on "Create subnet."
Repeat the process to create the second public subnet:
Click on "Create subnet."
Fill in the details for the second public subnet:
Name tag: hycloud-public-subnet-02
VPC: Select the VPC.
Availability Zone: Choose a different availability zone (e.g., us-east-1b).
IPv4 CIDR block: Enter
192.0.2.0/24.
Click on "Create subnet."
Private Subnets:
Now, let's create two private subnets:
Click on "Create subnet."
Fill in the details for the first private subnet:
Name tag: hycloud-private-subnet-01
VPC: Select the VPC.
Availability Zone: Choose an availability zone (e.g., us-east-1a).
IPv4 CIDR block: Enter
192.0.3.0/24.
Click on "Create subnet."
Repeat the process to create the second private subnet:
Click on "Create subnet."
Fill in the details for the second private subnet:
Name tag: hycloud-private-subnet-02
VPC: Select the VPC.
Availability Zone: Choose a different availability zone (e.g., us-east-1b).
IPv4 CIDR block: Enter
192.0.4.0/24.
Click on "Create subnet."
Step 3: Update Route Tables and Internet Gateway
Follow the steps mentioned in the previous response to update route tables, create an Internet Gateway (IGW), and associate subnets with the main route table.
Step 4: Create a Private Route Table
In the VPC Dashboard, click on "Route Tables" in the left navigation pane.
Click on "Create Route Table."
Fill in the following details:
Name tag: hycloud-private-rt-01
VPC: Select the VPC you created.
Click on "Create."
Step 2: Associate Private Subnets with the Private Route Table
Still in the "Route Tables" section, select the newly created hycloud-private-rt-01.
Click on the "Subnet Associations" tab.
Click "Edit subnet associations."
Select both private subnets (
hycloud-private-subnet-01andhycloud-private-subnet-02).Click on "Save."
Step 3: Add a Route for Private Subnet Traffic
Select the
hycloud-private-subnet.Click on the "Routes" tab.
Click "Edit routes."
Add a route for your private subnet traffic:
Click "Add route."
For the destination, enter
0.0.0.0/0(which represents all traffic).For the target, you'll later associate this route with the NAT Gateway. Leave it blank for now.
Click "Save routes."
Step 4: Create and Associate a NAT Gateway
In the VPC Dashboard, click on "Nat Gateways" in the left navigation pane.
Click on "Create Nat Gateway."
Fill in the following details:
Subnet: Choose one of the public subnets (e.g.,
hycloud-public-subnet-01).Elastic IP Allocation ID: Choose an existing Elastic IP or create a new one.
Click on "Create Nat Gateway."
Wait for the NAT Gateway to become available.
Once the NAT Gateway is available, go back to the
hycloud-private-rt-01.In the "Routes" tab, click "Edit routes."
Add a route for internet traffic:
For the destination, enter
0.0.0.0/0.For the target, select the NAT Gateway you just created.
Click "Save routes."

VPC-3: US-WEST-2
Now, follow the same steps and create another VPC in different region,CIDR-172.0.0.0/16 with public and private subnet, create a NAT Gateway.

Its time to connect all three vpc using transit gateway.
Step 1: Create a Transit Gateway in us-east-1
In the AWS Management Console, navigate to the "Transit Gateways" section.
Click on "Create Transit Gateway."
Fill in the required details:
Name: Provide a name for your Transit Gateway.
Amazon side ASN: Choose a unique Autonomous System Number (ASN). You can use the default provided by AWS.
Description: Optionally, add a description.
Click on "Create Transit Gateway."
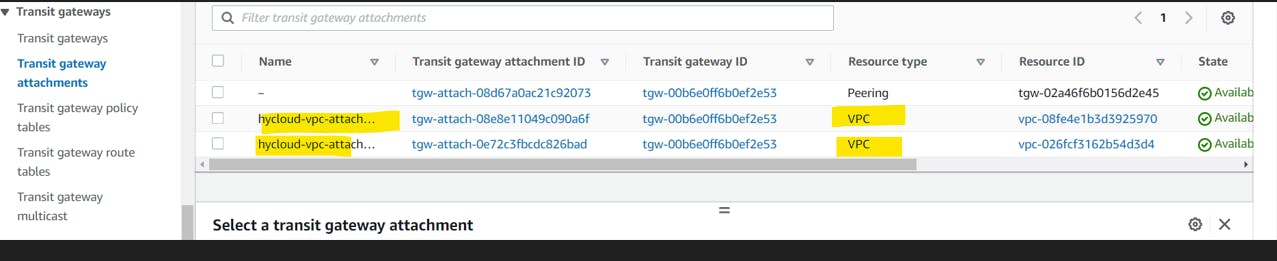
Step 2: Attach VPCs to the Transit Gateway
In the Transit Gateway Dashboard, select your newly created Transit Gateway.
Go to the "Attachments" tab.
Click on "Create Transit Gateway Attachment."
Fill in the required details:
Transit Gateway Attachment Name: Provide a name for the attachment.
Attachment Type: Choose "VPC."
VPC ID: Select the first VPC you want to connect.
Subnet IDs: Choose the subnets within the VPC that should be part of this attachment.
Click on "Create attachment."
Repeat the process to attach the second VPC to the Transit Gateway.
Step 3: Update VPC Route Tables
In the VPC Dashboard, go to "Route Tables."
For each VPC:
Select the VPC's main route table.
Add a route for the Transit Gateway:
Destination: Enter the CIDR block of the other VPC.
Target: Choose the Transit Gateway ID.
Step 4: Propagate Routes (Optional)
In the Transit Gateway Dashboard, go to the "Route Tables" tab.
Select the default route table.
Click on "Associations" and associate the route table with the VPC attachments.
Enable route propagation for the route table.

Go to the different region 9 us-west-2) and create another transit gateway.
Next , we will have to create transit gateway attachment with type peering to connect 2 transit gateway.
Create a Transit Gateway Attachment with Type Peering
In the AWS Management Console, navigate to the "Transit Gateways" section.
Select the first Transit Gateway.
Go to the "Attachments" tab.
Click on "Create Transit Gateway Attachment."
Fill in the required details:
Transit Gateway Attachment Name: Provide a name for the attachment.
Attachment Type: Choose "Peering."
Peer Transit Gateway ID: Select the ID of the second Transit Gateway.
Routing Options: Choose the appropriate routing option based on your requirements.
Association Default Route Table: Choose whether to associate the default route table.
Click on "Create attachment."
Step 3: Accept Peering Attachment Requests
Go to the "Transit Gateways" section.
Select the second Transit Gateway.
Go to the "Attachments" tab.
You should see a pending attachment request from the first Transit Gateway.
Click on "Accept attachment."
Step 4: Update Route Tables (Optional)
You may need to update the route tables associated with the Transit Gateways to enable routing between attached VPCs.

Now we have to update the transit gateway to route to route traffic between two transit gateway in different region.
To create a static route between two Transit Gateways for traffic between the 10.0.0.0/16 and 192.0.0.0/16 CIDR blocks, you'll need to update the route tables associated with the Transit Gateways. Here's a general guide:
Step 1: Identify the Transit Gateways and Route Tables
In the AWS Management Console, navigate to the "Transit Gateways" section.
Identify the two Transit Gateways you want to connect.
For each Transit Gateway, note the associated route table ID.
Step 2: Update Route Tables
For Transit Gateway 1:
Go to the "Transit Gateways" section.
Select Transit Gateway 1.
Go to the "Route Tables" tab.
Select the route table associated with Transit Gateway 1.
Click on "Edit routes."
Add a static route for the
192.0.0.0/16CIDR block:Destination:
192.0.0.0/16Target: Transit Gateway 2 Attachment ID or Peer Transit Gateway ID
Save the changes.
For Transit Gateway 2:
Go to the "Transit Gateways" section.
Select Transit Gateway 2.
Go to the "Route Tables" tab.
Select the route table associated with Transit Gateway 2.
Click on "Edit routes."
Add a static route for the
10.0.0.0/16CIDR block:Destination:
10.0.0.0/16Target: Transit Gateway 1 Attachment ID or Peer Transit Gateway ID
Save the changes.
Now, its time to deploy bastion host in VPC-1, two web-server gateway, ALB and NAT in VPC-2 . Also, App-server and NAT gateway in VPC-3
Create bastion host in VPC-1 public subnet. Please follow the below docs to create ec2 .
Step 2: Create your EC2 resources and launch your EC2 instance - Amazon Elastic File System
Now, create ALB and attach targets. We will be using listeners and port 80 and 443. I'll be using ACM for SSL certificate.
Step 1: Create an Application Load Balancer (ALB)
In the AWS Management Console, navigate to the "EC2" service.
In the left navigation pane, under "Load Balancing," select "Load Balancers."
Click on "Create Load Balancer."
Choose "Application Load Balancer" and click "Create."
Configure the ALB settings:
Name: Provide a name for your ALB.
Scheme: Choose "internet-facing" for a public-facing ALB.
Listeners: Add a listener (e.g., HTTP on port 80 and 443).
Create a New Target Group
Click on the "Create Target Group" button.
Configure the target group settings:
Name: Provide a name for your target group.
Protocol: Choose the protocol for your target group (e.g., HTTP or HTTPS).
Port: Specify the port (e.g., 80 for HTTP).
VPC: Select the VPC in which your ALB and instances are located.
Click on "Next" to proceed to the Health checks configuration.
Step 3: Configure Health Checks
Configure the health check settings:
Protocol: Choose the protocol for health checks (e.g., HTTP or HTTPS).
Path: Specify the health check path.(index.html)
Port: Specify the port for health checks.
Healthy threshold: Set the number of consecutive successful health checks required to consider an instance healthy.
Unhealthy threshold: Set the number of consecutive failed health checks required to consider an instance unhealthy.
Timeout: Set the amount of time to wait when receiving a response to a health check.
Interval: Set the time between health checks.
Click on "Next" to proceed to the Targets configuration.
Proceed without targets.

Step 2: Create EC2 Instances in Private Subnets
In the AWS Management Console, navigate to the "EC2" service.
Launch two EC2 instances in your private subnets.
While launching instances, configure the following:
AMI: Choose an Amazon Linux 2 AMI or any other suitable AMI.
Instance Type: Choose an appropriate instance type.
Network: Select the VPC and private subnet for each instance.
Security Group: Allow incoming traffic on port 80 and 443 (HTTP & HTTPS)
for httpd.
Under "Advanced Details" or "User Data," provide the following user data script:
     #!/bin/bash
     yum update -y
     yum install -y httpd
     systemctl start httpd
     systemctl enable httpd
     echo "<html><body><h1>Hello from EC2</h1></body></html>" > /var/www/html/index.html
     echo "ServerName $(curl -s http://169.254.169.254/latest/meta-data/local-ipv4)" >> /etc/httpd/conf/httpd.conf
Step 3: Attach EC2 Instances to ALB
Once the EC2 instances are running, go back to the ALB configuration.
In the ALB menu, select the "Target Groups" tab.
Click on "Create Target Group."
Name: Provide a name for the target group.
Protocol: Choose "HTTP" or "HTTPS" based on your needs.
Port: Set to 80
VPC: Select the VPC.
In the "Targets" tab, register your EC2 instances.
Go back to the "Listeners" tab, edit the listener, and associate the target group with the listener.
Similarly, please launch another ec2 in us-west-2 region VPC.
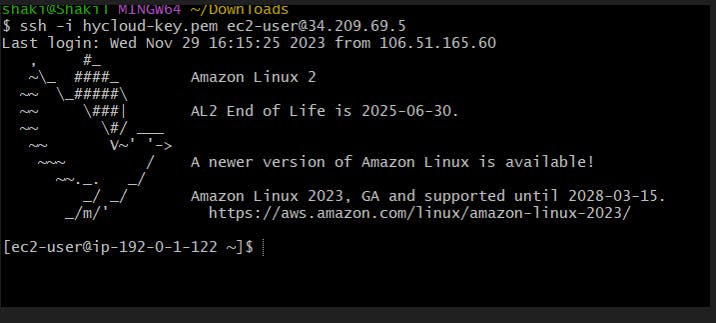
Test Connectivity:
Login to Bastion host with public IP:
Try to telnet and ssh to one of the server in private subnet
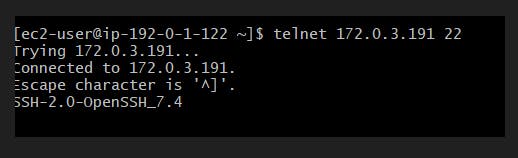

We noticed that telnet and SSH is successful. Please make sure that you add the key-pair in bastion host before proceeding with SSH.
And, also telnet from private ec2 to private ec2 in different region is successful.

Create a SSL certificate in ACM and update the route53 records. We need to have a custom domain to get the SSL.


I have copied and static html file into the /var/www/html folder .
Now, open the web browser and enter hycloud.in.
Please follow the page for more AWS and DevOps Project articles. Also, connect on LinkedIn- Md Shakil | LinkedIn